 Санте

For many retail products, the answer is yes: a heat-sealable stand-up pouch with a zipper is filled and then heat-sealed before sale. The zipper lets the customer close the bag again after opening. The top heat seal provides the initial closure. These are different jobs.
That does not mean every zipper pouch needs the same process. Your product, pouch design, storage needs, and sales method all matter. If you are ordering bags for the first time, confirm the filling and sealing plan before approving the pouch.
What the Zipper and Heat Seal Each Do
A press-to-close zipper joins two matching tracks inside the bag. You can open and close it repeatedly. This is useful when customers take out a little product at a time, such as nuts, snacks, or craft beads.
A top heat seal joins the two inner film surfaces across the pouch opening. For a typical top-fill zipper pouch, this seal sits above the zipper. If the pouch has tear notches, the layout normally allows the customer to tear off the sealed header while leaving the zipper usable.
A closed zipper does not show that a separate top seal has been made. Equally, adding a heat seal does not by itself prove a particular shelf life. The material, finished seals, product, and storage conditions still need to work together.
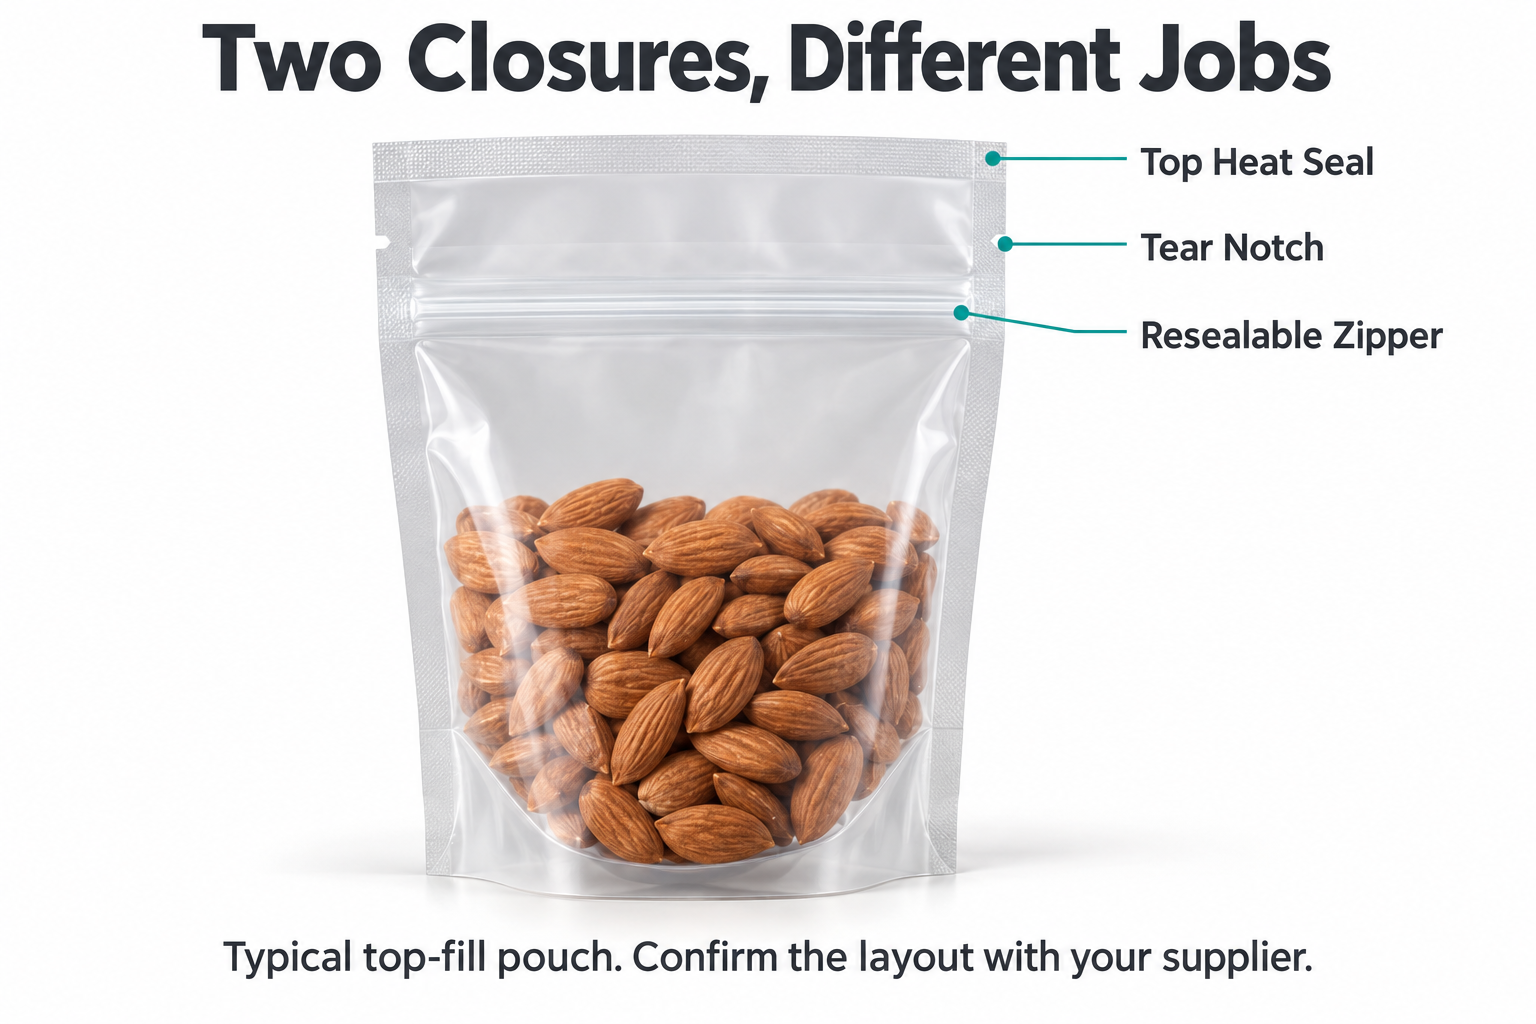
Figure 1. A typical top-fill layout. The heat seal is above the tear notch and zipper; confirm the positions on your own pouch drawing.
When Should You Consider a Top Heat Seal
If you are packing a product for retail shelves or delivery to customers, discuss the initial closure with your supplier. A zipper may be convenient for repeated use, but it should not automatically be treated as the complete packaging solution before sale.
Например, a bag of nuts may need an initial heat seal and a zipper for later use. A craft kit that is opened immediately for a workshop may have different needs. Check the actual handling and protection requirements rather than choosing only by appearance.
Tell the supplier whether the product will be sold in a shop, shipped individually, or packed inside another box. Also explain whether the customer is expected to open the bag once or use it several times. These details help you choose the closure and pouch format.
Leave Enough Space Before You Fill
A pouch can hold your product and still be awkward to seal. If the contents reach the zipper or fill the top header, you may struggle to flatten the film and position it on the sealer.
Use your intended fill weight or item count in a sample bag. Check that the product fits through the opening, the zipper works, and the planned heat-seal area stays clear. Ask the supplier to mark the required area instead of guessing one headspace measurement for every bag.
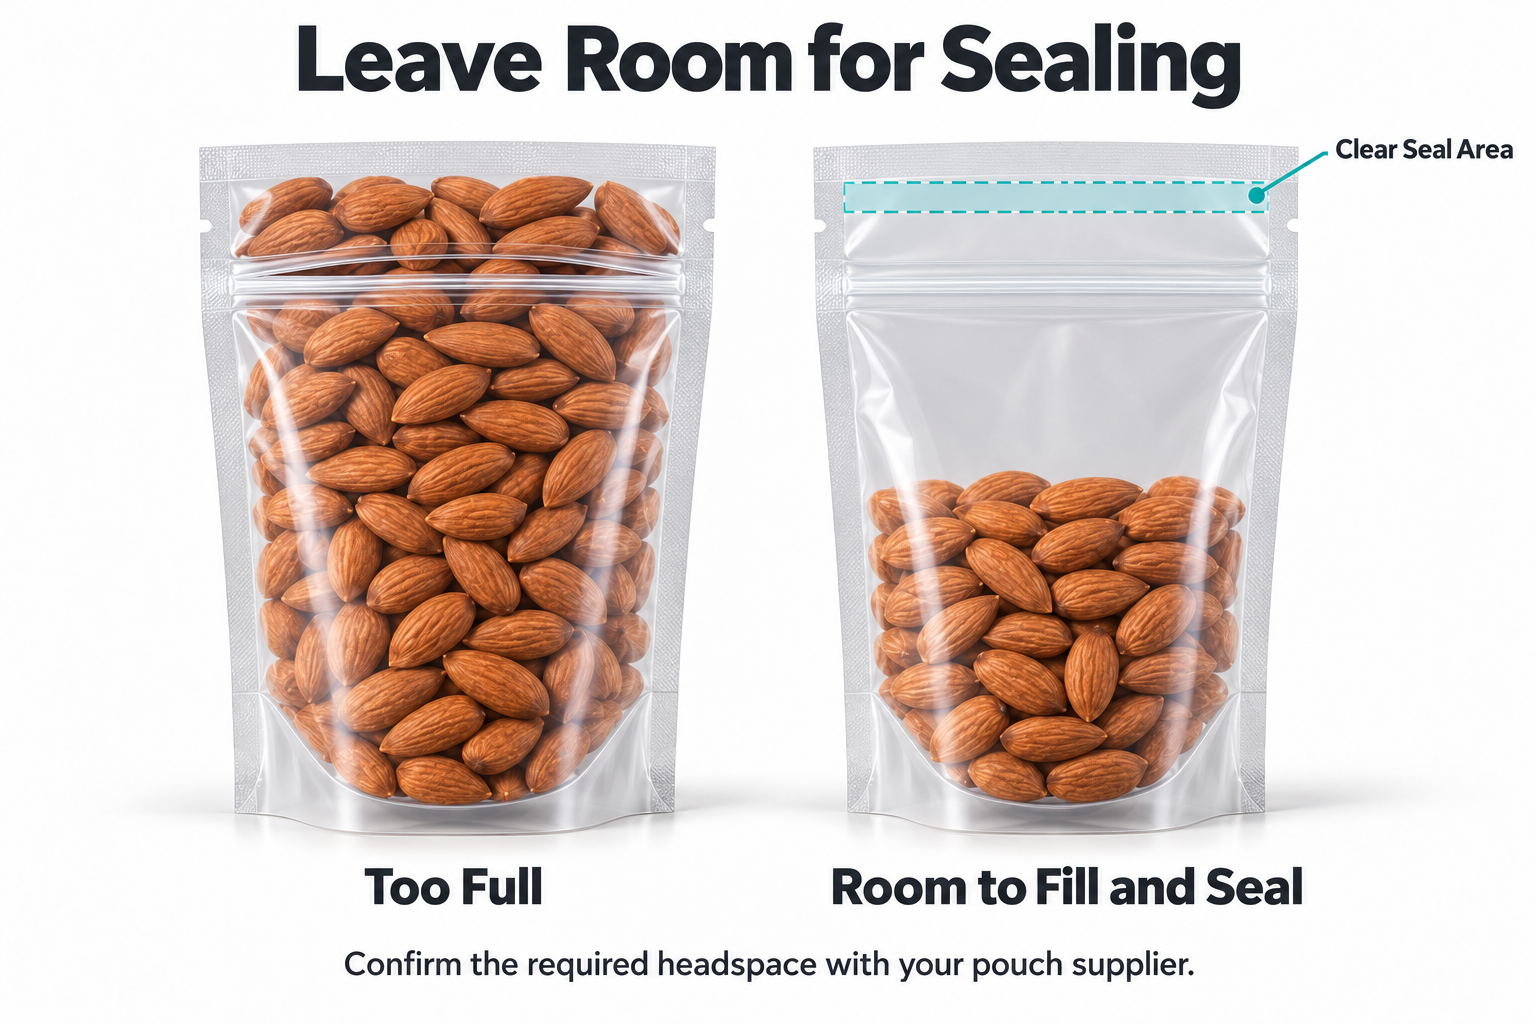
Figure 2. Keep the contents away from the zipper and the planned top-seal area. The fill levels are illustrative, not a capacity specification.
How to Heat Seal Stand Up Pouches
The following steps apply to a typical top-fill, heat-sealable zipper pouch. Bottom-fill bags and other opening styles may need a different sequence. Confirm your bag design first and follow the instructions for your sealing equipment.
1 Confirm the Bag and Sealer Are Compatible
Ask whether the sample is heat-sealable and whether its material matches your intended order. The machine must suit the pouch material, total film thickness at the seal, and full seal length. A sealer that works on one sample may need different settings for another.
2 Fill the Bag and Clear the Opening
Add the amount you plan to sell. Keep crumbs, powder, oil, and product pieces out of the sealing area. Check the zipper track too. If filling keeps contaminating these areas, discuss the filling method, bag opening, or another pouch size with your supplier.
3 Position the Seal in the Approved Area
Lay the film flat across the sealer in the area shown on the pouch drawing. Keep the zipper out of the sealing jaws. For the usual tear-off header, the heat seal must also leave the tear feature and zipper able to work as intended.
4 Trial the Settings and Follow the Cooling Cycle
Use the pouch supplier’s guidance and the machine instructions to establish trial settings. Some machines control heating time; others use temperature and conveyor speed. A dial number is not necessarily a temperature. Complete the specified heating and cooling cycle before removing or handling the seal.
5 Check the Finished Pack
Inspect the cooled seal for trapped product, folds, gaps, or obvious damage. Check more than one filled sample, and confirm that customers can open the header and still use the zipper. Agree any required seal-strength, leak, storage, and transport checks before production. Appearance alone cannot verify seal performance.
Common Sealing Problems to Catch Early
Product in the seal area and folded film are easy problems to miss when packing in a hurry. Make a habit of checking the opening before each seal. If the seal looks uneven or the film sticks or deforms, review the settings and equipment condition before continuing.
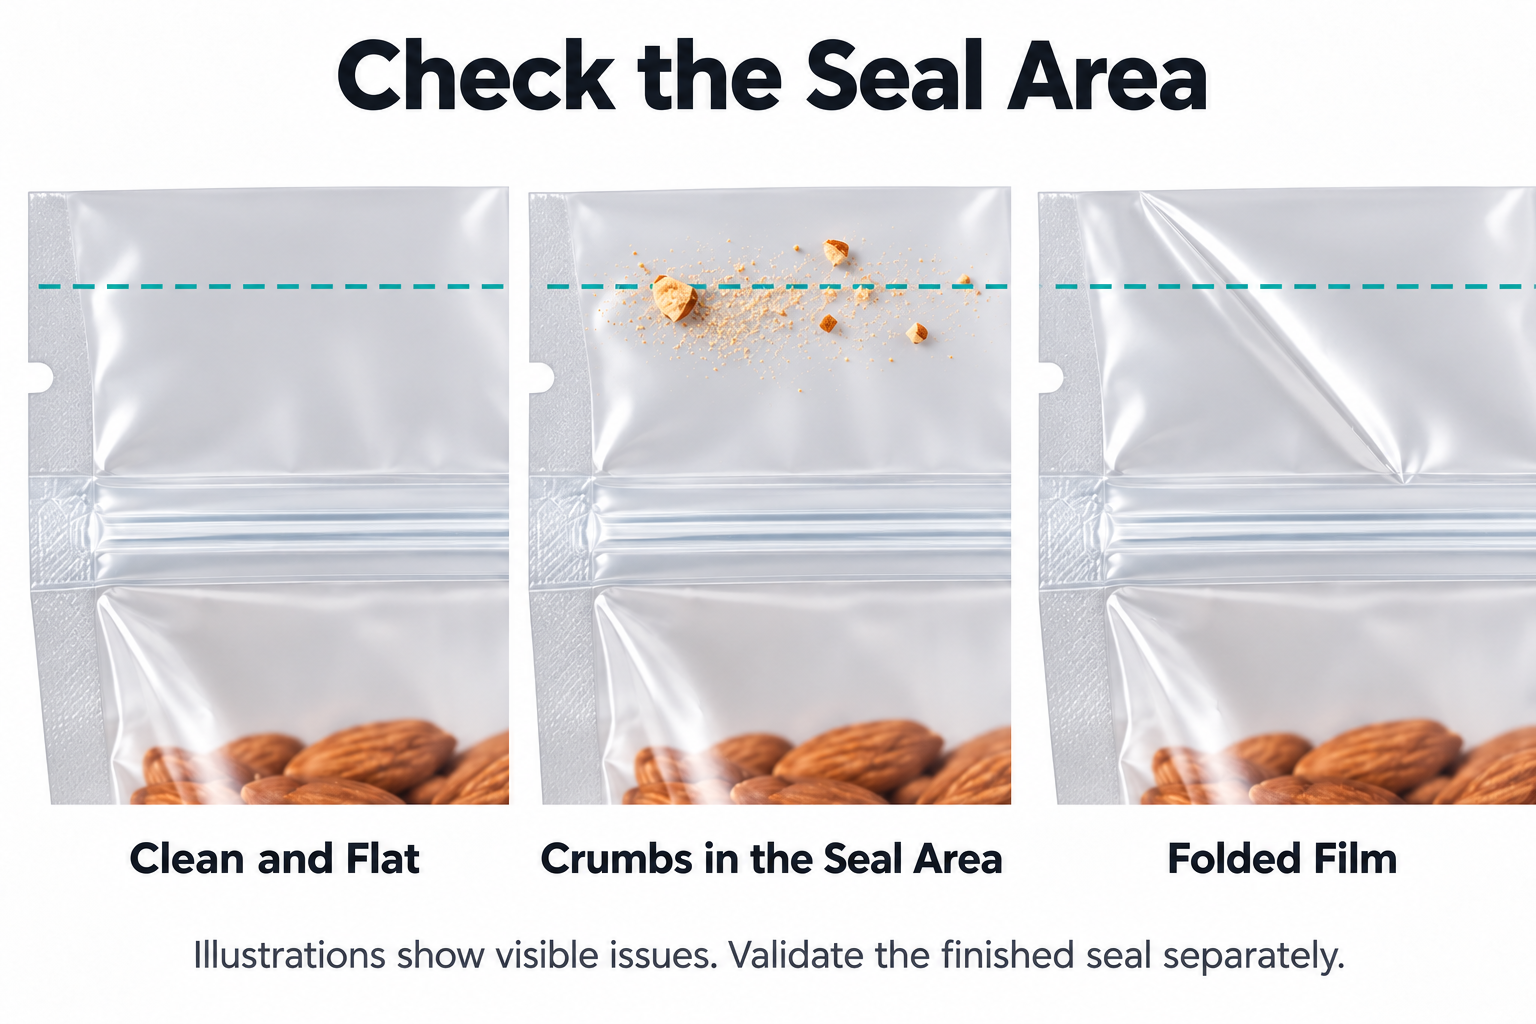
Figure 3. Check for a clean, flat sealing area before sealing. The dashed line shows an example position; these images do not verify finished-seal quality.
Avoid trying to fix every problem by increasing the heat. Misalignment, contamination, insufficient cooling, or an unsuitable machine can also affect the result. Record the material and settings used for your approved trial so the production team has a clear starting point.
What to Ask Before Ordering Pouches
Before placing an order, send your supplier the product details, fill amount, planned quantity, and filling method. If you already own a sealer, include its model and usable sealing length. A photo of the machine and an existing finished pack can help explain your setup.
Ask for confirmation of the filling opening, material, zipper position, usable seal area, and tear-notch layout. Then request samples close to the final specification. If a sample uses a different material, ask which checks it can support before relying on the result.
Frequently Asked Questions
Can I use any temperature I find online?
Нет. A suggested setting for another pouch is only a reference. Your material and machine need their own trial. Ask for suitable starting guidance and confirm the result with actual samples.
Can the customer use the zipper after opening?
Да, if the pouch is designed and opened correctly. In a typical tear-off layout, the top strip is removed above the zipper. Test this with the finished sample so opening does not damage the zipper.
Are clear and window pouches heat-sealable too?
They can be, depending on their material structure. Transparency, цвета, or a window does not identify the sealing layer. Confirm the specification and test the exact material you plan to order.
Find a Pouch That Fits Your Filling Process
Send us your product, fill amount, preferred pouch style, and sealing equipment details. We can help you choose suitable stand-up pouches and arrange available samples for trial filling and sealing before you confirm the order. Request suitable pouch samples.